|
|
|
Introduction
Download it
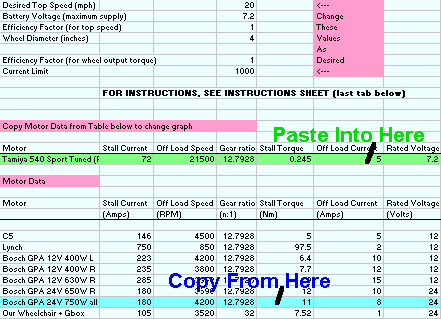
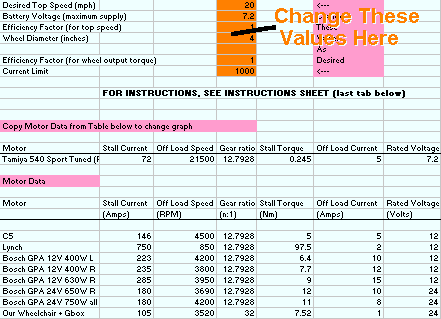
Just to give an idea of what the spreadsheet can do, we're going to set up the Bosch motor that most people use - the GPA 24V 750W. Remember the maths in the spreadsheet assume the motor is working to it's maximum, i.e. at full load.
  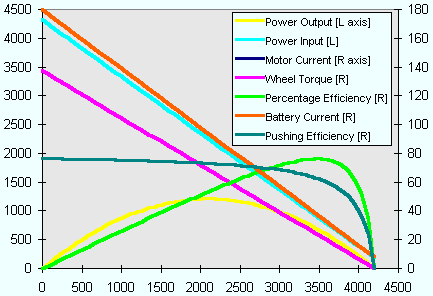 Motor Current and Battery Current (amps) Because there is no current limit, the motor current and battery current are the same. The current varies linearly from the maximum at zero rpm (when the motor is stalled), to the minimum at maximum speed (no load). It never reaches zero, because all motors have losses in the bearings etc, and these require power to overcome. Power Input (watts) This is simply the input current multiplied by the applied voltage (which is a constant 24V) - therfore as expected it's shape follows the current curve. Here the power input at stall is a massive 4400W, well above the motor's 750W rating! Wheel Torque (newton-metres) As torque is proportional to motor current, again this tracks the current curves; it is maximum at stall (0 rpm) and minimum at off load (4200rpm). The torque here is the torque at the wheel, i.e. multiplied through the gear ratio shown in the motor input field (green in Figure 1). It gives a good idea of how much pushing/acceleration force each motor will contribute. Power Output (watts) The power output of the motor is torque times speed - two quantities that are changing in opposite directions - as speed goes up, torque goes down. This is why the peak power output is always at half of maximum RPM (provided there is no current limit). It can be seen that the peak power output is considerably more than 750W - actually more like 1200W, that's 1.2kW. Note that the curve is always less than the power input, and the difference between the two is the wasted power - heat! Percentage Efficiency (percent) This is simply power output divided by power input. There's always power lost as heat in the windings, it's unavoidable. The more efficient a motor is, the longer your batteries will last and everything won't get as hot! It's always zero at stall and max rpm. Pushing Efficiency (newton-metres per amp) This is a fairly arbitrary curve, and only should be used to compare motors (setup using the same target speed and wheel size) when the choice between them is getting difficult. It's a measure of the torque produced by the motor for the current taken from the batteries - similar to the torque constant of the motor (one of the fundamental parameters that define a motor), but this takes into account the gear ratio, and any current limiting if present.  Motor Current This curve follows the battery current when the rpm is high enough that the current limit is not operating. But because of the current limit, it cannot rise above the current limit that has been set. Thus for a substantial chunk of the rpm range of the motor, it will operate in current limit. (But remember - the motor is only going to be in current limiting if it is fully loaded!) Battery Current (amps) You would expect this to be the same as the motor current - but while the current limit is operating, it is not. All PWM speed controllers that have current limiting operate in an efficient way that minimises power losses, called "switch mode" operation. You might find this quite a hard concept to understand - for this worked example, please just accept that it is correct! Power Input (watts) As before this is the input (battery) current multiplied by the applied voltage - but because the battery current drops at low rpm, the input power drops too, here to about 650W. This characteristic is what makes it much harder to burn out a stalled motor when you have a current limit. The peak power input is also much lower than before, it's only about 1700W - and look where it appears, at the same rpm as the maximum output power, and the same point that the motor comes out of current limit. It's not a coincidence! Wheel Torque (newton-metres) As torque is proportional to motor current, this tracks the motor current curve as before; it has a flat maximum at all speeds that the motor is in current limit. The maximum has dropped from that without the current limit; thus it can be said that the current limit directly affects the wheel torque. Power Output (watts) The power output of the motor is still torque times speed - but as the torque is lower (and constant) through most of the rpm range (while in current limit), the trace is linear rather than curved. The peak power output is still a relatively high 1100W, but it's no longer at half rpm. The most interesting comparison is the difference between power input and output - in this case it's never more than about 700W, and that's a huge difference to the unlimited case. Percentage Efficiency (percent) The current limit has helped to skew the efficiency - it's better at low rpm than it was before. It's the same observation as the relative difference between the input and output powers - less power is being wasted as heat. Pushing Efficiency (newton-metres per amp) This shows one of the real merits of current limiting - the pushing efficiency is greater while in current limit, because the battery current is dramtically lower. But it doesn't mean that this option will make the robot using it able to push more - the reduction in wheel torque is more important in this respect.
Choosing a motor using the Spreadsheet
|